DIY = Do It Yourself
SIP = Sequences Iterations Permutations, a program of Jasper Goodrich at the Hyde Park Art Center
Hypar = Hyperbolic Paraboloid
Zine = A fan magaZINE, full of passion, printed simply, passed from hand to hand, a samizdat
The Source Photograph
 |
| Merwin Wolf, Washington University Track (1946) |
 |
| Larry Wolf, Merwin Wolf Slide - W. U. 1946 Track (2022) |
The Four Hypars at the SIP Exhibition
 |
| Larry Wolf, SIP Hypar Hurdlers (2022) |
Hyperbolic Paraboloid
Folded Paper ModelNested Squares
The Printed Sheet
 |
| Larry Wolf - DIY SIP Hypar - Sheet 1, Side 1 (2022) |
Do It Yourself Instructions
This will require patience, attention and caring, allowing the form to emerge. Take your time. Breathe. When you become frustrated, take a moment to refresh. Allow time. It will take several minutes to fold one. It's a mindless-mindful activity. Let go of expectations. Stop looking at the clock. Settle into the doing.
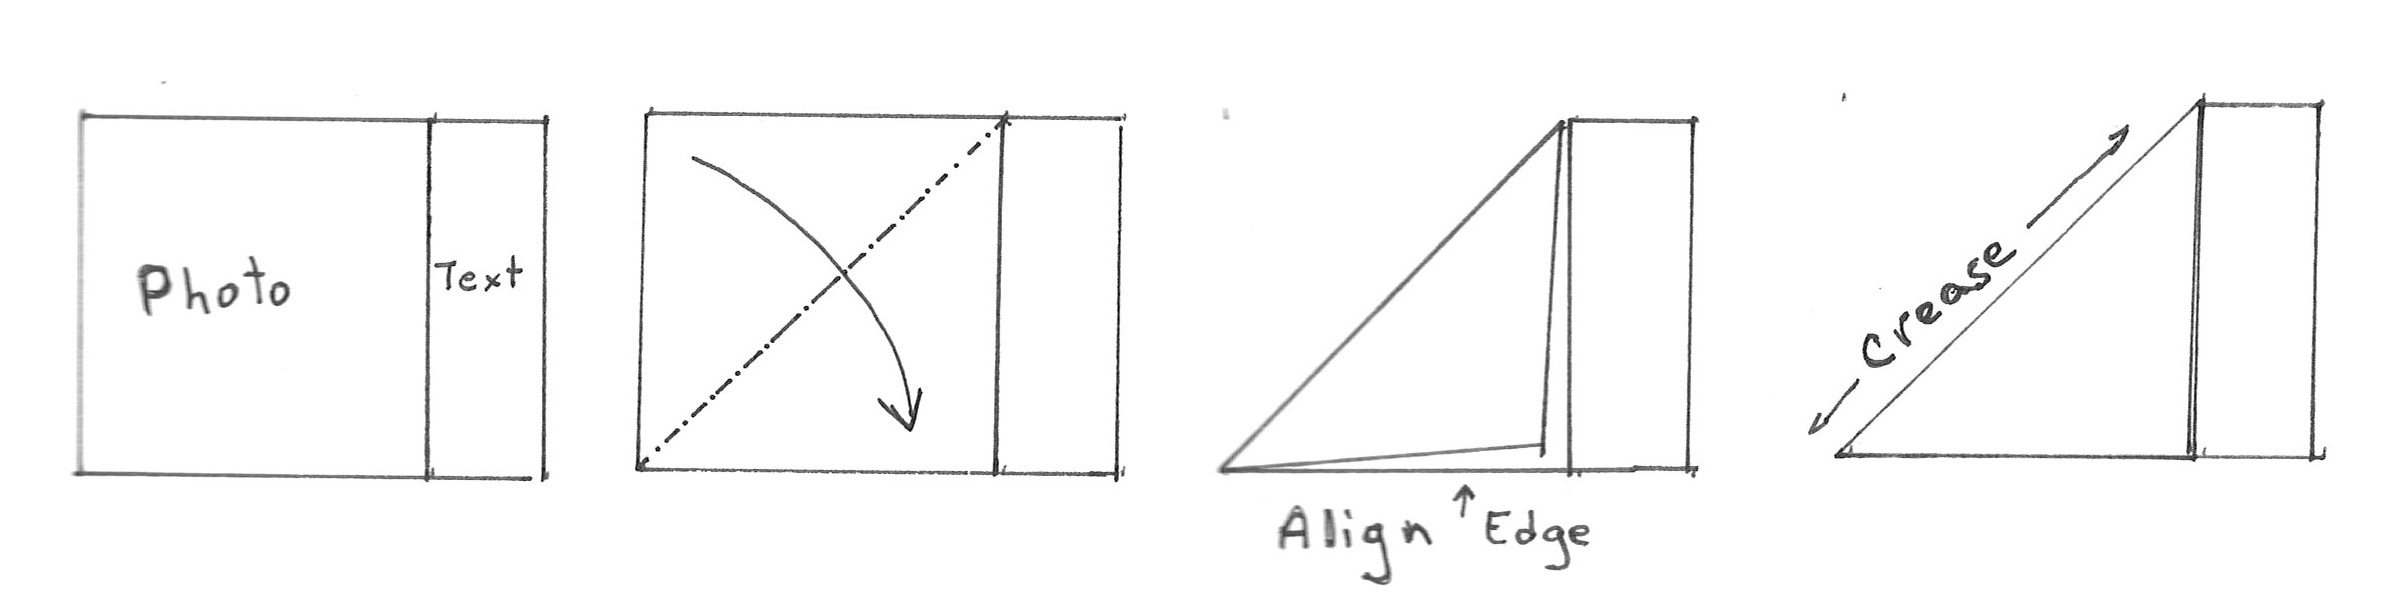
Become familiar with the sheet of paper and what is printed on it. There is a square area with a photograph and a rectangular area with text. The sheet has a white border where the printer didn't print. There is also a white space between the photograph and the cut line that will roughly equal this same border. The rectangle with text will be removed at the cut/tear line. This will leave the square out of which the hypar is created.
This is very hands-on exercise. The assembler, that's you, manipulates the paper, feels the edges, puts their fingerprints all over the photograph. No tools are needed other than your hands.
Align and Crease
The basic steps are to align two edges and then crease the paper to maintain that alignment. The paper will remember the fold.
At each step, use the fingers of one hand to feel the edges to make sure they are aligned while using the fingers of the other hand to gently crease the paper so that the resulting fold keeps the edges aligned. Make small adjustments to the fold to keep the edges aligned. The two hands will learn to work in coordination with each other. Be patient. Feel your way along.
Using the fingernails as a tool can help form a sharp crease or you could use a blunt edge, such as a bone folder, against a flat surface.
1. Separate the Text from the Photograph
This will create the main square and the two diagonal creases which meet in the middle of the square. The diagonals will be key to the curve of the hypar.
1. a. Creates the first diagonal fold.
Bring the left edge of the paper to the bottom edge. Feel the alignment of the two edges.
Holding those edges together with one hand, crease the paper along the diagonal with the other hand.
Then using both hands, make the fold a sharp crease.
Unfold the paper.
1. b. Create the second diagonal fold
Bring the left edge of the paper to the top edge. Feel the alignment of the two edges.
Holding those edges together with one hand, crease the paper along the diagonal with the other hand.
Then using both hands, make the fold a sharp crease.
Unfold the paper.
There are now two diagonal folds that meet in the middle of the photograph.
1. c. Create the "cut here" fold
Fold the "tab" with text so that the fold meets the corners of the diagonal folds. Feel the top edge of the sheet as it is folded over to align with the edges of the page. This will also correspond to the "cut here" line between the text and the photograph.
Work the fold back and forth so that the paper can be torn along the fold line. Do this by first folding the page in one direction and making a sharp crease. Then repeatedly fold the sheet back on itself/in the other direction, each time making a sharp crease. After a few times, the paper will feel soft as the fibers start to break. At that point, beginning at one edge, gently pull/tear the tab from the square. If it starts to tear other than at the fold line, pause, take a breath, use fingernails to restart the tear along the fold. Continue gently tearing the paper until the tab is separated from the square.
Alternatively, you could use a scissor, or a knife and straight edge, to cut along this line.
2. Repeatedly Fold the Paper in Halves in One Direction
Create the fold lines for the nested squares by repeatedly folding the square in half, in half again (quarters), and one more time (eighths), into progressively narrower rectangles.
2. a. Fold in Half
Begin with the square and fold it in half, creating two equal-sized rectangles.
2. b. Fold Each Half in Half (making quarters)
2. c. Fold Each Quarter in Half (making eighths)
3. Repeatedly fold the Paper in Halves in the Other Direction
Rotate the sheet by a quarter turn/90°
Create the next set of fold lines at right angles from the first folds. This will result in a sheet covered in small squares.
3. a. Fold in Half
Begin with the square and fold it in half, creating two equal-sized rectangles.
3. b. Fold Each Half in Half (making quarters)
3. c. Fold Each Quarter in Half (making eighths)
4. Form the Nested Squares
Mountain Folds and Valley Folds - see the Folded Into Form photo, below.
Notice how the mountain folds come together at the outside corners, the crease of the diagonal and the crease of the first square. The diagonal then switches to a valley fold that leads to the valley folds of the next inner square. And then another set of mountain folds along the diagonal and the edge of the next inner square. The innermost square is has must the diagonal folds that meet at the center.
Now you do it. Beginning with the outside edge, make a mountain fold, bring it to the corner, fold the corner along the diagonal fold (the mountain fold of the side meets the mountain fold of the diagonal). Continue around the outside edge to the next corner, its diagonal fold, and so on, all around the square.
As you create this outside mountain fold, there is a corresponding valley fold happening at the edge toward the center.
Sharpen these creases along the folds of the outer mountain fold and of the next inner valley fold.
Working the next inner square, its boundary is the valley fold, working with the next inner mountain fold.
The innermost square is the meeting of the diagonal folds.
adjusting the folds gently as you go, feel the paper as it is formed, alternating mountain and valley folds, finding and adjusting the corner diagonals with the ridges of the main folds.
5. And finally the magic, allowing the hypar to snap into place.
one way and the other
Folded Into Form
 |
| Larry Wolf, DIY SIP Hypar - Washington University 1946 Track (2022) |
Artist's Statement: Washington University 1946 Track
Six hurdlers are all airborne in a photo by my father from 1946. Each athlete, or in one case, three of them, has been cropped from the full image and printed individually. Each sheet can be folded into a hyperbolic paraboloid, informally called a hypar, a surprisingly curved shape constructed from nested squares. Here the hypars are suspended, moving with the air currents.
This work continues my interest in how photographs incorporate time, the moment of exposure with the athletes all in the air, the moments of viewing – the photographer's and subjects' now, the viewers' now, the artist as an intermediary time machine.
The source photograph was found recently with other slides from 1946 to 1957 – a lost family archive found as we emptied my deceased mother's apartment, a survivor of a nasty divorce. My father spoke with longing for his student days at W. U. – the image exudes youthful energy years after his death – as desaturated images, the people become ghosts in the light and dark of the hypar’s folds.
Like my other works in this show, these are single sheets of paper, folded according to a set of rules that creates a three-dimensional object – a standing figure, an accordion-fold zine, an 8-page mini-book, a freestanding structure, a hypar. Folding adds human touch to mechanical reproduction.
Creating the hypar can be done with a mechanistic precision, measuring along the diagonals, scoring the edges of the nested squares with a blunt tool and a straight edge. They can also be folded completely in hand, without measuring, by repeatedly folding the paper in half, in half again, and so on, feeling the edges of the prior folds as guides for the next folds, turning the paper in one's hands, adjusting the fold gently, a caressing of the paper and image as it is folded, unfolded and snapped into shape.
The act of folding is centering, requiring patience, attention and caring, allowing the form to emerge. It invites the viewer into an active intimacy, participating in creating the work.
The Artist's Journey
Zines - a personal statement, a way to make photographs physical, to package a story, an essay, in a simple way that creates objects which are easily shared.
Zine = A fan magaZINE, full of passion, printed simply, passed from hand to hand, a capitalist samizdat
Zines - as Folded Paper - from accordion to 3-D to Mathemagic Modernist Origami
Accessible - Mechanically Reproduced, Manually Completed, DIY
Physical - to make, to hold
Modes of Thinking - visual, poetic, contemplative / Bauhaus,
Modes of Communication - to mail, to pass around, to spark a conversation
Multiples - repeating and repeating / Gertrude Stein
Eadweard Muybridge - Animal Locomotion
.jpg) |
| Eadweard Muybridge, Man in pelvis cloth hurdling horizontal pole (1884/1886/1887) |
Bauhaus Preliminary Course
 |
| Students in Albers's preliminary course: paper study (1927-28) |
Foliate construction: a circular piece of paper was folded like a fan, from two opposite points of departure. This resulted in a shrinkage which altered the periphery (form) of the sheet.
Square sheet: here too the paper was folded fanlike from two opposite sides. The folds cross each other and result in a "snake" effect-one edge curves up, the other down.Wing form: automatic result of folding concentric squares.
Bauhaus (1962/1969/1976 MIT Press)
See also the Numi Bridge blog post for a hyperbolic paraboloid made of string.
No comments:
Post a Comment